

Why Every Home Gardener Needs Drip Irrigation
Traditional watering methods waste up to 50% of water through evaporation and runoff. Drip irrigation delivers water slowly and directly to plant roots where it's needed most. According to the Environmental Protection Agency, drip systems can reduce outdoor water use by 30-50% compared to sprinklers. For the average homeowner, this translates to saving 5,000-15,000 gallons of water annually while producing healthier plants with fewer weeds.
Unlike sprinklers that wet foliage (promoting disease), drip irrigation keeps leaves dry while maintaining consistent soil moisture. This precise watering method is particularly valuable during drought restrictions when every drop counts. The initial investment pays for itself in just one or two growing seasons through lower water bills and improved harvest yields.
Essential Components for Your DIY Drip System
| Component | Budget Option | Premium Option | When to Use |
|---|---|---|---|
| Water Source Connector | Garden hose adapter ($5) | Pressure regulator kit ($15) | All systems |
| Mainline Tubing | 1/2" polyethylene ($0.10/ft) | 1/2" reinforced hose ($0.25/ft) | Over 50 ft runs |
| Emitter Type | Pre-installed emitters ($0.50/ft) | Adjustable emitters ($1.25/unit) | Varying plant needs |
| Filter | Basic screen filter ($8) | Self-cleaning filter ($25) | Well water systems |
Step-by-Step Installation Guide
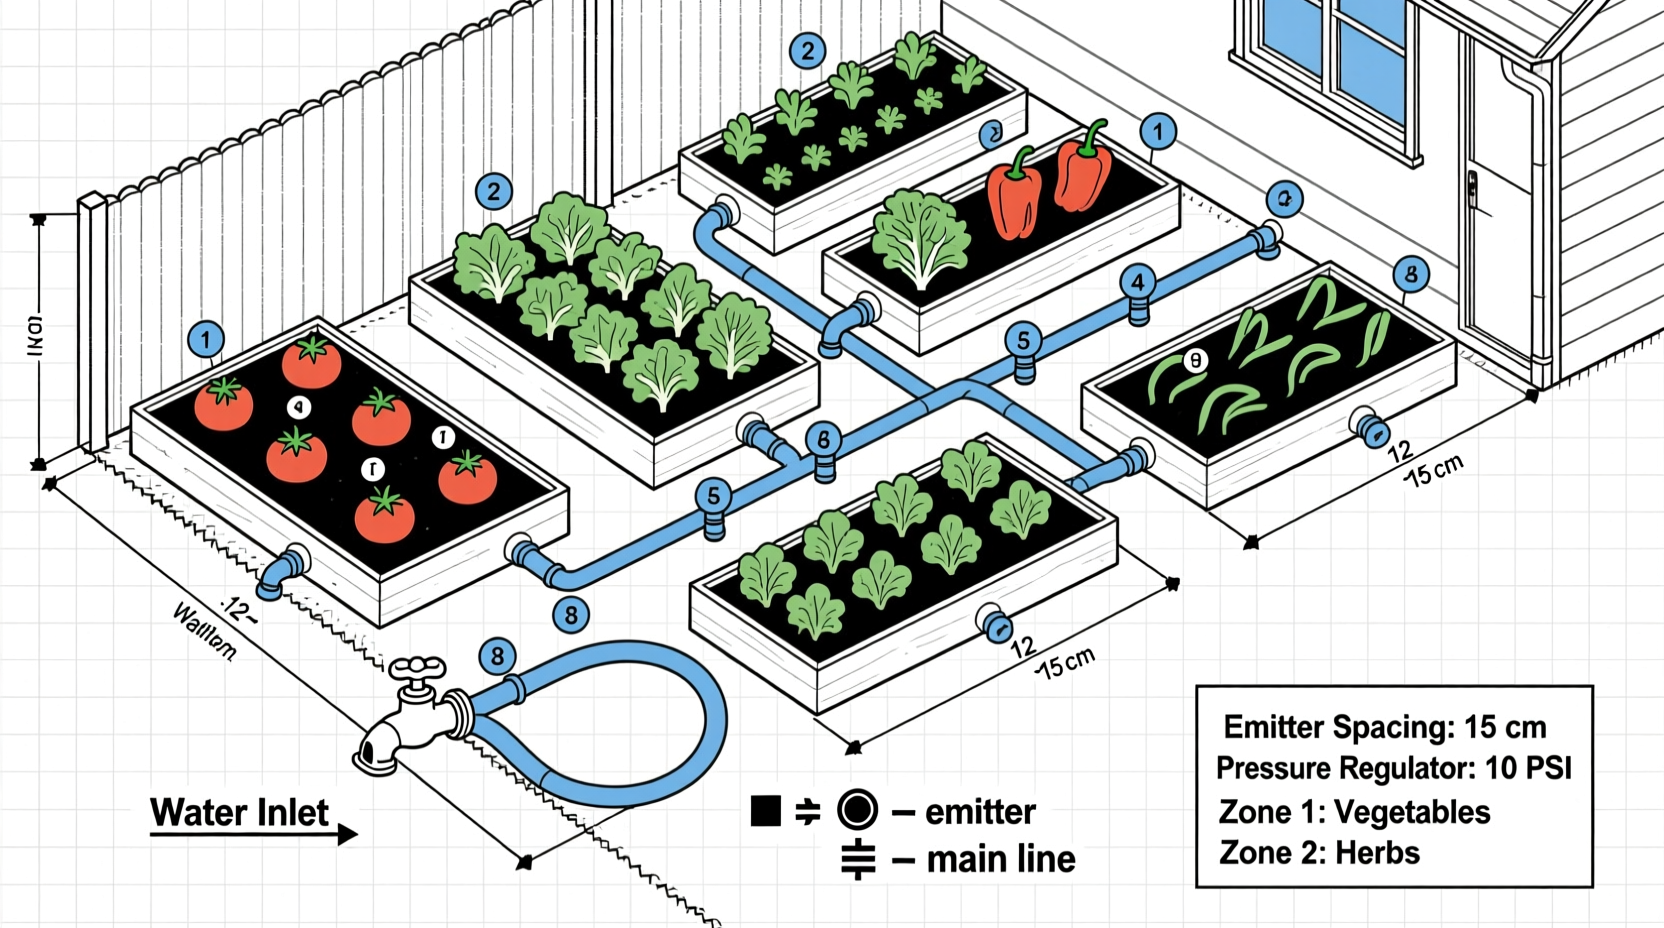
Step 1: Design Your Layout
Measure your garden space and sketch a simple diagram showing plant locations. Group plants by water needs—vegetables typically require more water than drought-tolerant perennials. Calculate total emitter requirements: most vegetables need 1-2 emitters per plant, while trees may need 4-6. Keep mainline runs under 200 feet for optimal pressure.
Step 2: Connect to Water Source
Install a backflow preventer and pressure regulator (25-30 PSI) directly to your outdoor faucet. Add a filter to prevent emitter clogs, especially if using well water. For seasonal gardens, include a drain valve at the lowest point to prevent winter freeze damage.
Step 3: Lay Mainline Tubing
Run 1/2" mainline tubing along garden edges, securing with landscape staples every 3 feet. Avoid sharp bends—maintain gentle curves with at least 12-inch radius. For raised beds, run tubing along the perimeter before connecting to individual emitters.
Step 4: Install Emitters Strategically
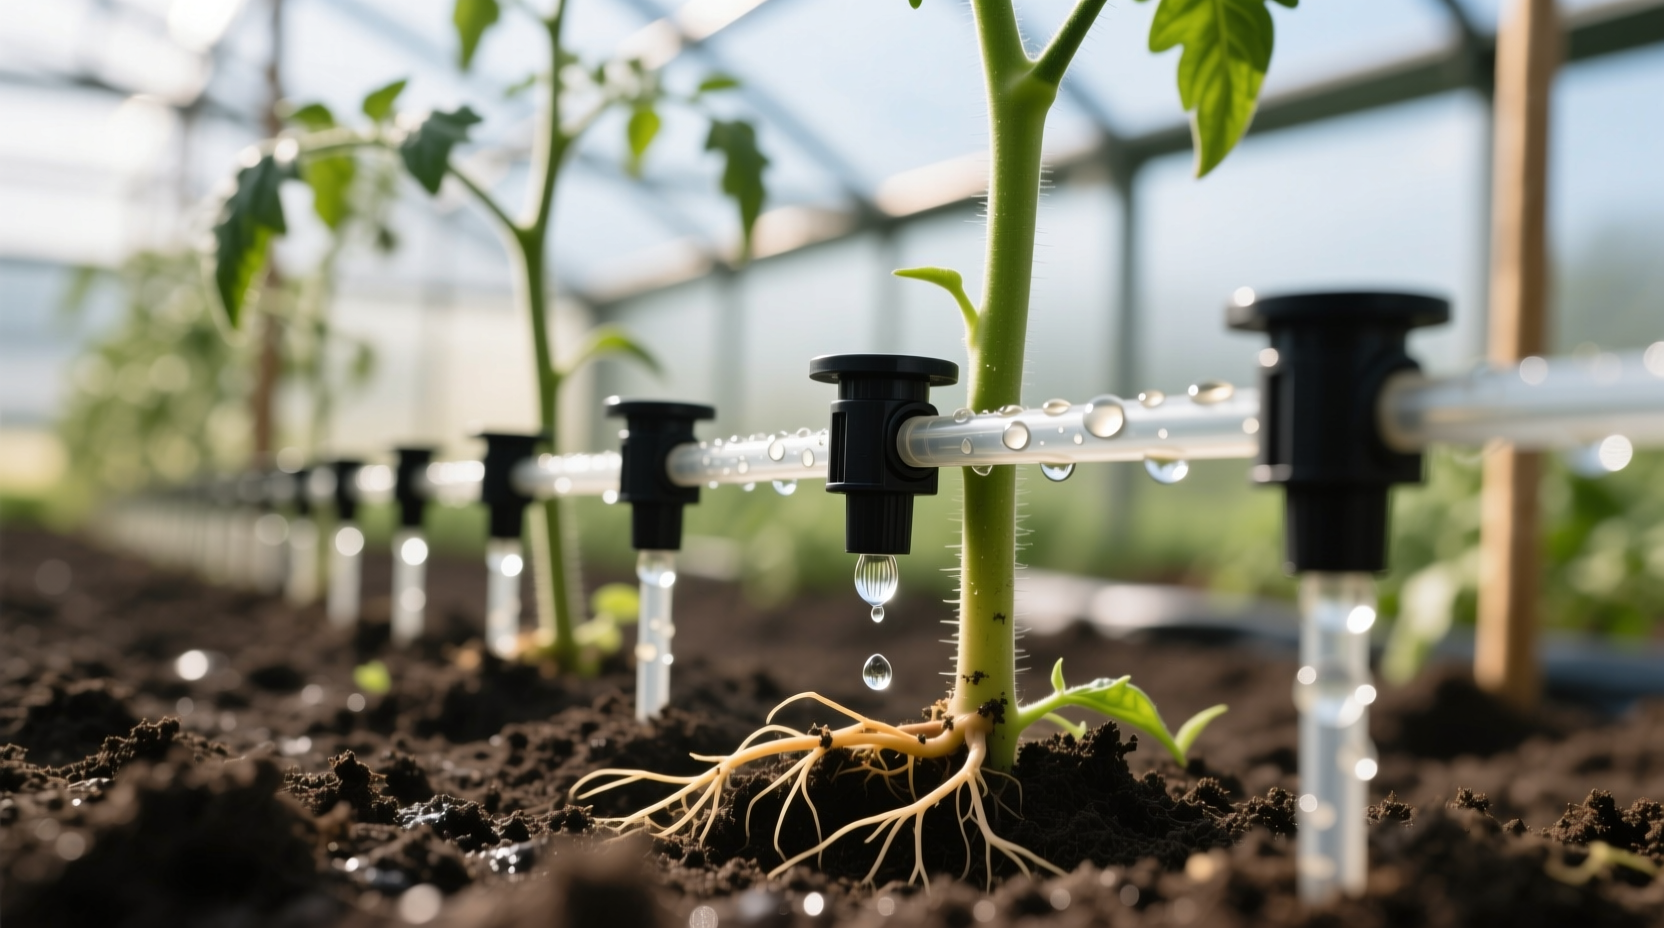
Place emitters 6-12 inches from plant stems, adjusting based on root spread. For vegetables, use 1 GPH (gallon per hour) emitters; for trees, use 2-4 GPH. In sandy soil, place emitters closer together; in clay soil, space them farther apart. Always position emitters uphill from plants on sloped terrain.
Step 5: Test and Adjust
Run your system for 30 minutes and check for leaks, proper coverage, and adequate saturation. Dig down to verify moisture reaches 6-8 inches deep—the typical root zone for most vegetables. Adjust emitter placement or run times based on actual soil moisture, not just schedule.
Customizing for Different Garden Types
Vegetable Gardens: Use 1 GPH emitters spaced 12 inches apart along rows. For tomatoes and peppers, place two emitters per plant initially, adding more as plants grow. Run 20-30 minutes daily during peak growing season.
Container Plants: Install 0.5 GPH micro-tubing with built-in emitters, running one line per 12-inch pot. Use a pressure-compensating system to ensure even watering across multiple containers at different heights.
Sloped Landscapes: Position emitters above plants rather than below to prevent runoff. Use pressure-compensating emitters that deliver consistent flow regardless of elevation changes. Install check valves to prevent drainage after shutdown.
Maintenance Schedule for Long-Term Success
- Weekly: Inspect for leaks, clogs, and proper emitter function
- Monthly: Flush mainlines by removing end caps and running water for 2 minutes
- Seasonally: Clean filters and replace worn emitters before planting
- Annually: Store above-ground components before first frost in cold climates
Advanced Water-Saving Techniques
Integrate your drip system with a rain barrel by elevating the barrel 2-3 feet above your garden. This gravity-fed approach requires no pump and provides free, chlorine-free water. Add a simple $15 timer to automate watering during early morning hours when evaporation is lowest.
For maximum efficiency, combine drip irrigation with soil moisture sensors that automatically shut off the system when adequate moisture is detected. This simple upgrade can reduce water usage by an additional 15-20% compared to timer-only systems.
Frequently Asked Questions
How much does a complete DIY drip irrigation system cost?
A basic 100-square-foot garden system costs $50-$80 using budget components. Larger gardens (500+ sq ft) typically require $100-$150. This represents 30-50% of professional installation costs while delivering comparable water savings and plant benefits.
Can I install drip irrigation on a sloped yard?
Yes, but use pressure-compensating emitters that maintain consistent flow regardless of elevation changes. Position emitters above plants rather than below to prevent runoff. Install check valves at the end of lines to prevent drainage after shutdown on steep slopes.
How often should I run my drip irrigation system?
During peak growing season, run systems 20-30 minutes daily for vegetables or 30-45 minutes every other day for established perennials. Adjust based on soil type—sandy soils need more frequent, shorter runs while clay soils require longer intervals between watering. Always verify actual soil moisture before watering.
What's the most common mistake beginners make with drip systems?
Overestimating water needs and running systems too frequently. Most plants thrive with deeper, less frequent watering that encourages root growth. Start with 15-minute test runs, then check soil moisture depth. Adjust to deliver water only as fast as your soil can absorb it to prevent runoff and wasted water.


 浙公网安备
33010002000092号
浙公网安备
33010002000092号 浙B2-20120091-4