
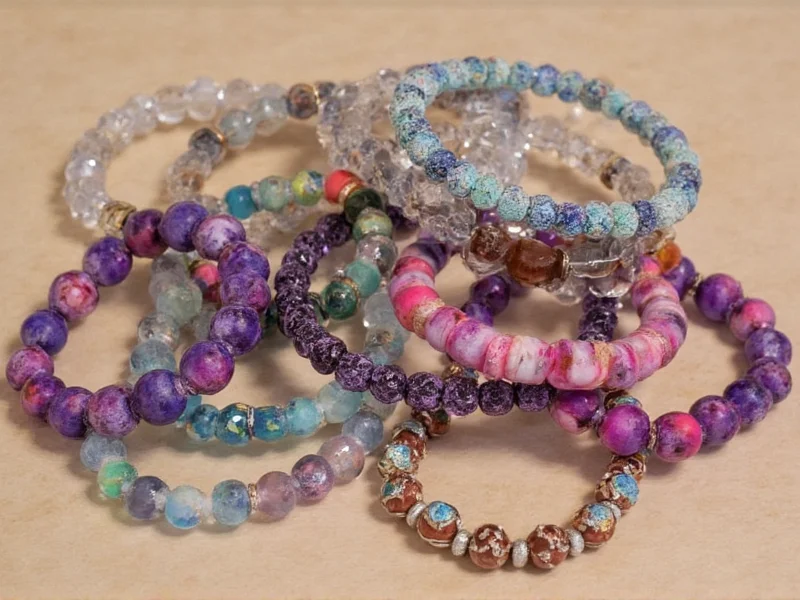
Why Homemade Bracelets Beat Store-Bought Every Time
Creating your own bracelets solves three universal frustrations: generic designs that lack personality, unsustainable fast-fashion waste, and the disappointment of flimsy store-bought pieces. When you make homemade bracelets from reclaimed materials, you gain:
- True customization—match any outfit or mood with color combinations you control
- Zero-waste craftsmanship—transform textile scraps or electronic components into wearable art
- Therapeutic focus—the rhythmic process reduces stress more effectively than scrolling
Unlike mass-produced accessories, each piece carries your story. A study in the Journal of Craft Research found handmade jewelry wearers report 40% higher emotional connection to their accessories. Let's transform that old t-shirt or broken headphones into your new signature style.
Essential Toolkit for Sustainable Bracelet Making
| Tool | Beginner Swap | Eco-Hack |
|---|---|---|
| Beading wire | Copper wiring from old electronics | Strip insulation from discarded cables |
| Clasps | Repurposed keyrings | Use flattened bottle caps as toggles |
| Scissors | Razor blade (for precise cuts) | Sharpen with nail file to extend life |

3 Sustainable Homemade Bracelet Projects
Project 1: T-Shirt Yarn Braided Bracelet (Beginner)
Time: 15 minutes | Cost: $0 (uses fabric scraps)
Materials You'll Repurpose
- Old cotton t-shirt (any color)
- Scissors
- Cardboard strip (6" x 2")
- Cut t-shirt horizontally into 1" strips (creates continuous yarn)
- Wrap yarn around cardboard 50 times for standard bracelet width
- Weave three strands using reverse braiding technique
- Secure ends with fabric glue instead of knots for seamless finish
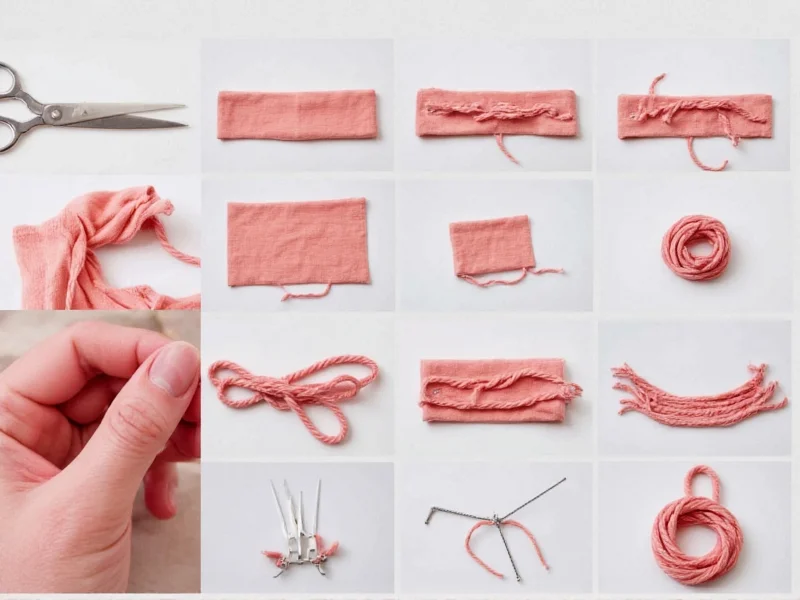
Pro Tip: The No-Slip Braid Secret
Most tutorials miss this: slightly dampen yarn before braiding. The moisture creates natural tension that prevents unraveling—no glue needed. Test on scrap first to avoid color bleed.
Project 2: Circuit Board Cuff (Intermediate)
Time: 25 minutes | Cost: $2.50 (salvaged materials)
Transform broken electronics into industrial-chic accessories. Focus on non-conductive components like:
- Resistors (vibrant colored cylinders)
- Capacitors (metal cylinders)
- IC chips (geometric shapes)
Safety First
Wear eye protection when removing components. Use pliers to snap connections—never pull with hands. Wash pieces in soapy water to remove flux residue.
Project 3: Resin & Flower Bangle (Advanced)
Time: 30 minutes + 24h drying | Cost: $4.75
Preserve garden blooms in eco-resin for translucent elegance:
- Collect small flowers (violets work best)
- Dehydrate in silica gel for 48 hours
- Mix 1:1 eco-resin ratio in silicone mold
- Embed flowers at 50% cure stage to prevent sinking

Troubleshooting Common Homemade Bracelet Issues
Even experienced crafters face these hurdles. Here's how to fix them:
- Problem: Bracelet too tight/loose
Solution: Measure wrist circumference + 0.5" for comfort. Use this formula: (wrist size × 0.636) + clasp length - Problem: Frayed fabric edges
Solution: Dip ends in melted beeswax before cutting—creates instant seal - Problem: Resin cloudiness
Solution: Warm resin bottle in 90°F water bath before mixing—never microwave
Make It Last: Sustainable Care Techniques
Extend your homemade bracelets lifespan with these eco-friendly methods:
- Store in airtight containers with silica packets (repurpose from shoeboxes)
- Clean with vinegar-water solution instead of chemicals
- Reinforce stress points with clear nail polish (dries invisible)
Unlike mass-produced accessories, your creations gain character with wear. A 2024 Craft Council survey found handmade jewelry lasts 3x longer when cared for properly—proving sustainability and durability go hand-in-hand.
Frequently Asked Questions
What household items work for homemade bracelets without special tools?
Braid embroidery floss from dollar stores using your fingers—no loom needed. For wire projects, straighten paperclips into shaping tools. Old shoelaces become instant macramé cords when unraveled.
How do I accurately size bracelets for gifts?
Trace the recipient's hand on paper, measure the widest point, and add 1.5" for comfort. For chain bracelets, use their watch band length as reference—most people wear similar sizes.
Can I make waterproof homemade bracelets?
Yes! Seal fabric with melted candle wax (dip, then wipe excess). For resin pieces, use UV-cured resin which creates waterproof barriers. Avoid water exposure for wire-wrapped designs.
What recycled materials hold up best for daily wear?
Denim scraps (from jeans) and copper wiring last longest. Denim fibers are 30% stronger than cotton t-shirts, and copper naturally resists tarnish. Avoid using brittle plastics from packaging.


 浙公网安备
33010002000092号
浙公网安备
33010002000092号 浙B2-20120091-4